Bonnie Blog: Seat Reupholstery
- visualizethis
- Jul 24, 2022
- 6 min read
Updated: Dec 14, 2025
Welcome to Bonnie Blog. This entry is about reupholstering my 1973 Triumph Bonneville's tired old dilapidated seat. The old seat was tear free and still looked ok, but I decided to tackle this project for two reasons. For one, the Triumph logo out back had completely faded away, and two, the creamy filling had no life remaining in it and it felt like I was sitting directly on the seat pan. Maybe reason number three was that I wanted to lower the seat in keeping with my mild 60s theme customization plans.
The originality status of this motorcycle had faded away many years ago via multiple ownerships through its almost 50 years of existence. When doing surgery on the old cover I could see that it was also a replacement. Additionally, the seat pan had been repaired with nicely welded in sections to replace rot, and most all of the metal tabs that secure the cover to the pan were either missing or were one bend from falling off altogether.
So that's the segue for my final disclosure before detailing this process. I do not intend that this vintage motorcycle ever be a Concours restoration. At least not while I own it. My intentions for it are that it mostly be a "preservation" with tasteful and reversible customizations and that it stay a runner. For instance, I've replaced the air box with chrome filter pods and faux oil tank side covers, and will soon install fork gators to make the bike appear more like a pre-70s Bonneville. And fitting with the sixties period look, I lowered (flattened) the seat to do away with that 1970s bulky look.
Let's start with the list of parts and tools I needed for this project:
New seat cover - I found this one from TheBonnevilleShop
New seat trim molding - I found this also from TheBonnevilleShop
New seat foam - (the creamy filling) I found a quality one with the correct pan ridges molded into its bottom side from ClassicBritishSpares. (The ridges help secure the foam from shifting around on the pan)
Upholstery barb rails from Amazon
Seat batting from Walmart fabric department
3M spray glue from my local hardware store
Rivets to fasten the barb rails to the seat pan
Dremel drill with cut-off disc to shave the rivet excess
Carpenter's saw to cut out layers from the seat foam
High speed grinder with flapper disc to carve the foam
The process of removing a layer of foam to lower the seat was kind of a trial and error process. To make sure I was cutting "straight" and "level", I first marked a line with magic marker using a ruler to control its depth and making sure the line was consistent on both sides. Keeping the cuts level is critical for keeping one's bum from tipping to one side or the other. Making my first pass with a coarse carpenter's saw, I soon realized my line was going to intercept with a molded-in fender hump recess in the underbelly of the foam. This is why you see a step in my cut plane below. I went as far as I could from the front, stopping just before the blade would rupture the recess for the fender. Then I reentered from the back side elevating the plane a bit to miss the hump.


Once I had a one half inch slice removed, I checked the fit by roughly assembling the seat pan, foam, and cover while placing it on the bike. The front nose of the seat was still too high for my taste - higher than even the one I was replacing and higher looking than the sleek low seats of the sixties Bonnevilles. Back to the cutting table I went and sliced out another half inch from just the rider portion, making for a slight step in the seat.


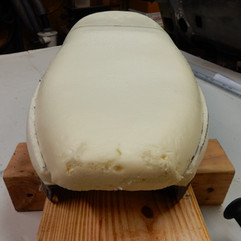
Now pleased with the height, I used the 3M spay adhesive to bond the layers of foam together. The 4th photo below shows the foam assembly after gluing. You can see the overhang of the nose and the lower layer is proud on the sides. This had to be shaved flush.


Using a high speed grinder fitted with a flapper sanding disc, I shaped the unions flush. The nose needed a section filled in, which I was able to find from the scrap slices. I glued the nose filler in place and sanded it to proper shape.


With the foam shaping finished, I next had to address the seat pan by fitting the barb rail around its inner perimeter. I drilled and riveted it in place as seen below. One probably could do without the barbed rail and just resort to adhesive, especially since there is a series of clips that go over the lip to secure both the vinyl and trim molding. However the barb rails make fitting the vinyl easier and kind of serve as a third hand.


I riveted from outside in so that there was no protrusion of the rivets on the outside. I then used a Dremel with cut-off disc to remove as much of the rivet on the inside that I could get away with.


I cleaned up the seat pan with paint thinner and alcohol, applied 3M spray adhesive, and pressed the seat foam into position. This step was tricky because I only had one shot at it. Once the two surfaces came into contact, there was no correcting it.
(Note: there are spray adhesives that allow some degree of correction, but I happened to choose the "heavy duty" version of the 3M adhesive which left no tolerance for mistakes).


Next up was the fitting of a layer of "cotton" batting on the foam pad. This too was adhered in place with the 3M product. I then flipped the seat on its back and trimmed the excess away.
Fitting the vinyl cover was the reveal - the fruits of my labor. However, It took a lot of care in getting it evenly tensioned on both sides. This was critical for a quality looking fit and if uneven, the Triumph logo would not be level. I got it close enough - not perfect, but good enough. I didn't want to reposition the vinyl once I stabbed the barbs through because then I would just create more perforations possibly weakening it.


With the vinyl cover in position, I bent the barbs flat and trimmed the excess vinyl away.


The finishing detail was the placement of the chrome/rubber trim molding. There are metal clips that help secure both the cover and this molding to the lip of the seat pan. The barbed clips took a little hammering to fit as they were very snug. The trim molding then was pressed in to place over these clips and the excess length was cut off.


After pressing the rubber frame cushions into place, I was then able to install it on the Bonneville.


And here it is installed. I think it looks pretty good. It's still not as low as some sixties seats, but it is a good compromise. Being an oil-in-frame generation Bonneville there is the tendency for the oil filler cutout in the back of the tank to show with lowered seats. This can be seen in the second and third photos below.
It's nice to once again to have a seat logo showing off the brand of this old gal!


My final remarks:
After riding on the new seat I realized I really didn't improve the comfort much. I attribute this somewhat to me carving out an inch of the rider portion, but mostly I blame the overly soft foam. If I would have left the full height in tact, I would have ended up with super mushy seat. If I would do it over again I'd find a firmer (denser) block of foam and shape it accordingly. If you take a look at a modern Triumph 1200 Scrambler you'll see that the seat is almost half as thick as this one and yet it's comfortable and you don't sink to the seat pan. I know, because I own one.
I might have tried not using the riveted barb rail, as a little adhesive along with the trim clips would have secured it fine. The barb rail did help get it positioned so I could concentrate on fitting the trim without having to hold everything all at once.
Once I had all the materials, this job only took an afternoon to complete. The effort produced satisfying results quickly.


Comments